How To Set Up Gmail To Send Emails

From Your Website's Email Address

How Do I Use Gmail To Get and Send Emails From My Website's Domain Name?

This question comes up so often, we’ve decided it was worthy of creating a page to show one of the effective methods that we have been using for a few years now. Of course there are other ways of connecting your domain email to your Gmail inbox.

One such alternative method would be for those users that are paying for a Google Workspace account (formerly known as G-suite). If that is the case for you, then Google essentially becomes your domain’s email provider. These instructions won’t help because you would need to add Google’s custom MX records to your domain DNS.

gmail-logo-2

Before We Begin: "Step 0" - The Prerequisites

gmail-login-page

You’ll need your domain email set up so Gmail can receive messages. We recommend forwarding domain emails to your gmail inbox, but this can be through forwarding, POP3, or IMAP — whichever method you prefer. Alternatively if you can access your domain’s email inbox directly, that will work too.

The last step of this process requires you to receive a confirmation email from Gmail and follow the link they send you to confirm that you have access to the accounts incoming emails and you want to enable the “Send Mail As” feature.

The other prerequisite will be having your Gmail password if you are on a mobile device (phone/tablet). As you will see in the next step, these settings are available in the mobile Gmail app. We will use a work-around to access your Gmail account via a mobile browser, which may require you to sign in again.

Step 1-A: Getting To Your Gmail Settings - Mobile vs Desktop

If you are signed into your Gmail account on a laptop/desktop computer, you can skip ahead to Step 2.

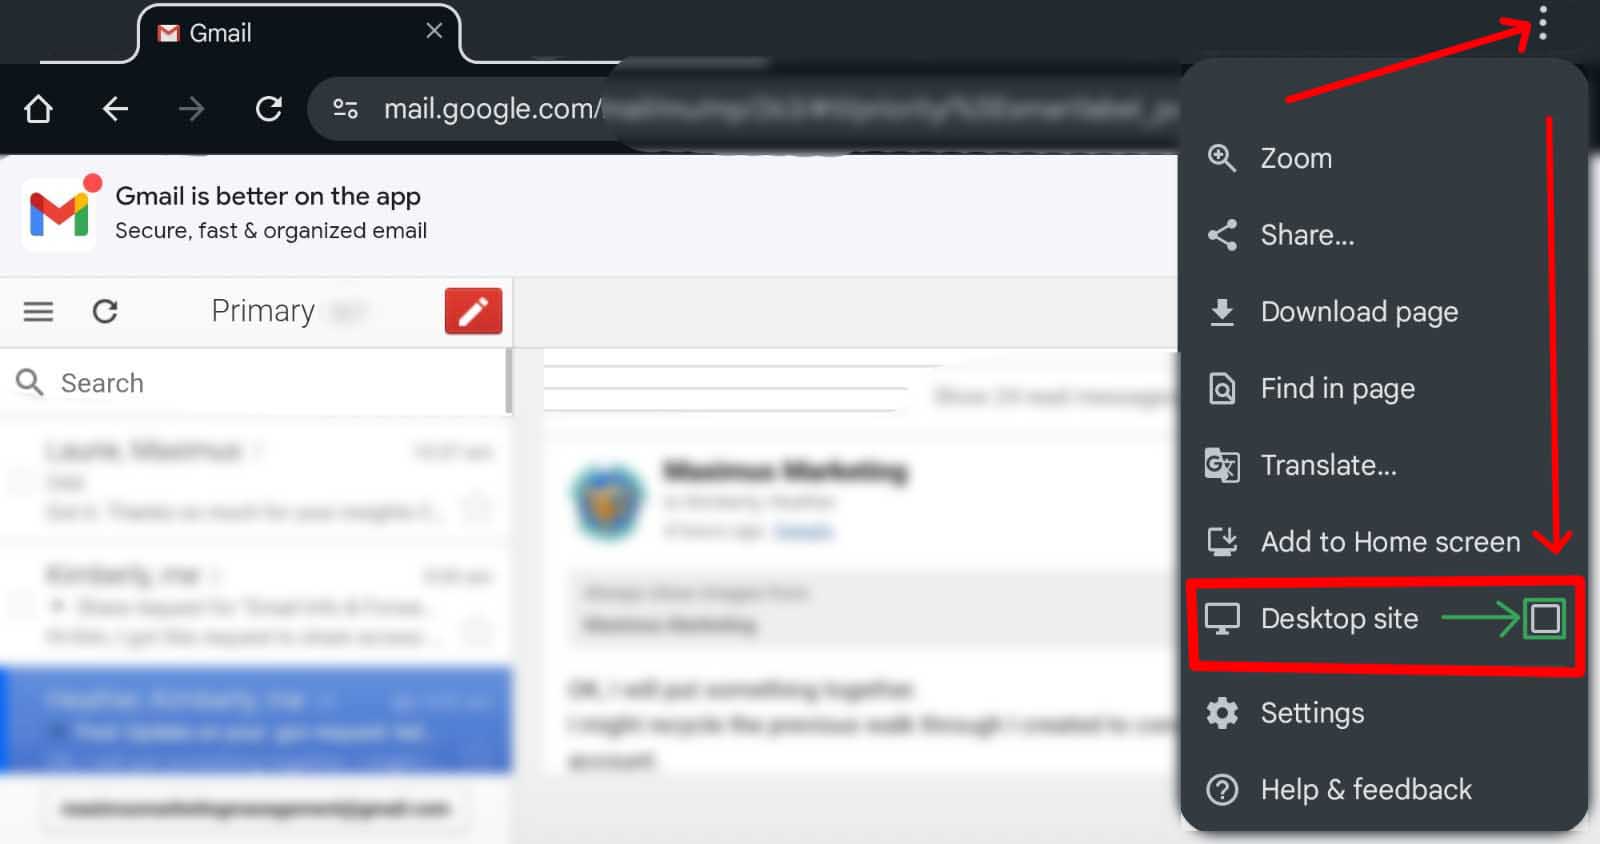
It’s becoming increasingly more common for people to only interact with their emails through the use of mobile apps like the Gmail app. Many people today do not have access to a proper computer or don’t have a need for one. While that is fine once this process is complete, you will need to access the desktop version of Gmail to set up the “Send Mail As” function.

Fear not because we have a work-around for mobile-only users (as long as you know your Gmail password).

You will need to open a web browser on your mobile device, such as Chrome, Firefox, or Safari and enter the Gmail URL: Https://mail.google.com/ If your browser shows you a big button that says “Open the Gmail App”, look on the screen for smaller text that says: “Use the web version”. This is what you want.

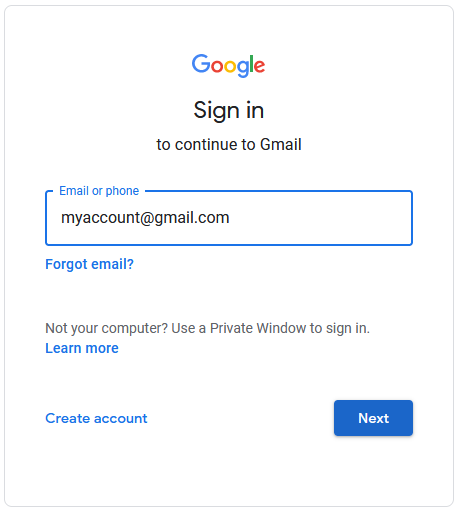
Once you do that, you will either be automatically logged into Gmail or you may be prompted to sign into your account.

If your device went to your inbox without asking for your password, skip ahead to Step 1-B. If your phone asked you to log in, follow the steps below:

Even though your Gmail app may be signed in already, the web browser may not have your gmail password saved. If you know it, then enter the correct password and follow any confirmation steps that might be required to confirm that it’s “really you” trying to log in.

If you don’t know your password you can either find it in your password manager, or you can reset your password. See the side bar for these steps.

SideBar - How to find your saved passwords (or reset them):

 View the Saved Password via Google Password Manager (If Saved)

  1. Open the Settings app on the Android phone, or open the Gmail app and select the Google account you want to use. Click on the small profile icon usually located in the upper right. 
  2. Tap Manage your Google Account. Or from the phone’s settings menu you can also search for Password Manager, then scroll down and tap Google
  3. If you don’t see your stored passwords already, then Scroll until you see the Security tab.
  4. Scroll down to the “Signing in to other sites” section and tap Password Manager.
  5. Search for https://www.google.com/search?q=Google.com (or simply “Google”) in the list of saved credentials.
  6. Tap the entry and authenticate (using PIN, pattern, face ID or fingerprint).
  7. Tap the eye icon (Show password) to reveal the saved password. You can then (long press to) copy this password and paste it into the desktop view of Gmail.


 View the Saved Password via Google Password Manager (If Saved)

  1. Open the Settings app on the Android phone.
  2. Scroll down and tap GoogleManage your Google Account.
  3. Scroll to the right and tap the Security tab.
  4. Scroll down to the “Signing in to Google” section and tap Password.
  5. On the password entry screen, tap Forgot password.
  6. Google will immediately verify the user by presenting a prompt that says something like “Use your screen lock?” or “Confirm your screen lock.”
  7. The user provides their phone’s PIN, pattern, or fingerprint.
  8. Once confirmed, Google skips the password entry and prompts the user to create a new password. Try to create a strong unique password that is hard to guess and avoid recycling old passwords. 
  9. Be sure to securely save this password because now your other devices may need this updated password before they will have access to your Gmail/Google services again.

Step 1-B You’re almost there! - Switching from Mobile to Desktop view

Step-1B

You’ll need your domain email set up so Gmail can receive messages. We recommend forwarding domain emails to your Gmail inbox, but this can be through forwarding, POP3, or IMAP — whichever method you prefer. Alternatively if you can access your domain’s email inbox directly, that will work too.

The last step of this process requires you to receive a confirmation email from Gmail and follow the link they send you to confirm that you have access to the accounts incoming emails and you want to enable the “Send Mail As” feature.

The other prerequisite will be having your Gmail password if you are on a mobile device (phone/tablet). As you will see in the next step, these settings are available in the mobile Gmail app. We will use a work-around to access your Gmail account via a mobile browser, which may require you to sign in again.

Step 2 All The Settings? Yes… All Of Them!

Now that we are all on the same page (apologies for any iPhone users if these steps haven’t worked for you), this next step is as easy as hitting the gear icon in the upper right. This will open a side panel and at the top you will click on “See All Settings”.

Step 2

Step 3 Accounts and Import tab.

Step 3

At the top of the “All Settings” page, you will see different tabs such as General, Labels, Inbox, and Accounts and Import. Tap on Accounts and Import.

From here you will scroll down and Tap on Add Another Email Address


Note: We will come back to this screen for Step 8 (which is optional) to set the Default Address if you wish to do that. But for now we can move on.

Step 4 Add Another Email Address

By default your Gmail sends messages from your Gmail address (IE YourName@gmail.com). This sounds obvious, but we are adding other email addresses which will become an “Email Alias”. We will come back to this point later once this process is complete.

Once this orange and yellow popup (or new tab) opens, you will see a field for Name and Email address.  The Name you enter here is what people will see when they get your email.
So in our fake example, John enters John Doe – ACME LLC. He could add a title like CEO or simply use his name and nothing more. The good news is that you can change this later.

Email Address: This needs to be the email address that you’re trying to import as an alias.
IE You@Example.com

Leave the box ticked for Treat as an alias and go on to Next Step

Step 4

Step 5 The Core Settings

Here are a few popular examples for the SMTP Server value:
Godaddy uses: smtpout.secureserver.net
Bluehost uses: mail.example.com (where ‘example.com’ is your actual domain name)
DreamHost uses: smtp.dreamhost.com
Hostinger uses: smtp.hostinger.com

When in doubt you can also try doing a Google search for this info. 

 View the Saved Password via Google Password Manager (If Saved)

  1. Open the Settings app on the Android phone, or open the Gmail app and select the Google account you want to use. Click on the small profile icon usually located in the upper right. 
  2. Tap Manage your Google Account. Or from the phone’s settings menu you can also search for Password Manager, then scroll down and tap Google
  3. If you don’t see your stored passwords already, then Scroll until you see the Security tab.
  4. Scroll down to the “Signing in to other sites” section and tap Password Manager.
  5. Search for https://www.google.com/search?q=Google.com (or simply “Google”) in the list of saved credentials.
  6. Tap the entry and authenticate (using PIN, pattern, face ID or fingerprint).
  7. Tap the eye icon (Show password) to reveal the saved password. You can then (long press to) copy this password and paste it into the desktop view of Gmail.


This step is arguably the most important. If you get an error in the process, it will probably be tied to this window, so let’s confirm everything is correct!

SMTP Server: This value will be different depending on who your domain is hosted with. You will need to confirm this value from your hosts documentation or ask your own IT dept / Webmaster

Next we come to the port. The port we recommend is 465 (with Implicit SSL/TLS encryption). If you want to know “why not use port 587?”, expand the text below this to see more details.


Username: This will be your email (unless your host says it’s something different)

Password: This is NOT your gmail password. This is the password that you (or your IT/Web Dev) created in cPanel or your hosts admin panel. If you didn’t create this, then this should have been sent to you by your system admin.

SSL vs TLS: Leave the default checked >> Secured Connection using SSL (recommended) <<

Once you have confirmed all of those fields, tap on Add Account >>

Step 6 Check your Inbox for the Confirmation Email!

You will see this popup/window.

If you want to play it safe, open your Gmail inbox in another window, use the app, or go to your domain’s inbox by another method to look for a new message at You@Example.com. This is why we said at the outset that you should have set up the forwarding for this address before starting this process. This last popup/screen will give you the option to [Resend email] or just Close window.

Step 6

Step 7 Follow the link to confirm.

If you got this email, open it to find the confirmation link.

If you have waited 5-10 minutes and there’s no email in your inbox or spam folder(s), you should try to check your domain’s email directly from the hosting admin panel or confirm that you’re getting other messages to the You@Example.com address and start over.
Assuming you got the confirmation email and followed the link, you just need to tap the Confirm button and you should be all set!

Step 8 Set Default OR Reply To Sender (Optional)

We wanted to take a minute and circle back to the Default Sender settings in the Accounts and Import tab.

If you want You@Example.com to be your Default address for messages you send out, you will need to set this as the default once you finish these steps and the alias is confirmed. If not you can choose to “Reply from the same address the message was sent to”, which is pretty self explanatory and a great option if your Gmail inbox has several aliases. You can also choose which address to send to on a case by case basis as shown in the previous step.

We can’t tell you which option is better for you, but we can suggest that you ask yourself: “Do I want the majority of my emails to come from Me@MyWebsite.com or MyName@Gmail.com?
When in doubt, we recommend the middle ground:  “Reply from the same address the message was sent to”. Just remember to select the intended outgoing Name/Address when composing a new message. It’s too easy to forget this step only to remember after hitting the Send button.

Gmail-Alias-Send-As-Setup_Example2-2

Step 9 Let’s confirm it’s working!

Step 10

If you followed all of these steps and want to confirm this is working, the easiest way to do this is go to your inbox and compose a New Message. In the FROM line you will probably see your Default Address as described in the previous step (IE YourName@Gmail.com).

To the right of that you should see this small arrow pointing down. When you open this dropdown menu, you should see the option to select your new domain email (or other aliases). You can tap on that and the email will be sent from one of these such as You@Example.com.

Go ahead and send yourself or someone else you know a test email. If sending it to yourself, it's better to test this using a second or third email address to confirm there is no system bias.

If you don’t immediately see the new email address in the From drop-down menu, don’t stress out yet. The best advice we can offer is: Give It A Few Minutes. This isn’t always necessary, but sometimes the systems need a moment to talk to each other and perform some backend handshakes.

In rare cases, this could take as much as 4-24 hours. If you still don’t see this option (after clicking on the confirmation email link) then something else is wrong. We suggest you contact your IT dept / Web Dev / Hosting Provider to ask why this isn’t working.

Did this work For You?

This should cover most use cases for adding a website email to your Gmail account so you can Send Mail As that email address. We realize that this walk-through favored the Android and Windows interface more than an iPhone or Mac, but the Apple version of the menus is very similar and Mac users also have many Mac/iPhone specific tutorials available to them via Google and Youtube.

If you hit a roadblock or would like some help with a specific question, we welcome your communications at Support@MaximusMarketingManagement.com
Your feedback also helps us improve this guide for others.

Enjoying Our Articles?

Or you can check our Socials:

Subscribe to get updates when we publish something new

You can unsubscribe at any time

Leave a Reply

Your email address will not be published. Required fields are marked *

Here Are Some Related Articles:

Check Out Some Other Great Articles:

Let's Find Some Time...

Schedule A Call or Meeting with Max

Disclaimer: By submitting an email address or phone number to this website, you consent to receive email and/or text messages from Maximus Marketing Management, our members, and/or our partners at the email address or phone number provided, including automated messages and messages related to Customer Care. Consent is not a condition of purchase. Msg & data rates may apply for text messages. Msg frequency varies. Unsubscribe at any time by replying STOP or clicking the unsubscribe link (where available). Reply HELP for help. See more info at: MaximusMarketingManagement.com/privacy-policy

Maximus
Marketing
Management

Project Inuqiry:

Prefer To Talk In Person?
Let's Schedule A Chat...

Disclaimer: By submitting an email address or phone number to this website, you consent to receive email and/or text messages from Maximus Marketing Management, our members, and/or our partners at the email address or phone number provided, including automated messages and messages related to Customer Care. Consent is not a condition of purchase. Msg & data rates may apply for text messages. Msg frequency varies. Unsubscribe at any time by replying STOP or clicking the unsubscribe link (where available). Reply HELP for help. See more info at: MaximusMarketingManagement.com/privacy-policy

Maximus
Marketing
Management

How Can We Help?

Prefer To Talk In Person?
Let's Schedule A Chat...

Info Needed To
Generate Report:

  • Your Name, Business Info, & URL
  • History of SEO Efforts
  • Target Audience & Direct Competitors
  • Key Metrics to Focus On
How To Set Up Gmail To Send Emails

Step 2/4: Website & Business Goals

What best describes your current SEO? *
What SEO strategies have you started working on?

Step 3/4: Target Audience & Competitors

What location(s) are you trying to reach people in?
Other?
Who are your top competitors in search results?

Step 4/4: Additional Insights *Optional but Useful!

Have you worked with an SEO agency before?
What’s your biggest SEO challenge right now?

The thing is...

This Page is only an Example.
It's not "Real".

Not All Of The Links Function the way They would If This was A Fully Developed Site

Looking For A Website?

build your brand.
grow your audience.
achieve your goals...

Let Us Show You What We Can Do!

What's You Biggest Goal For Social Media Marketing?
Opt-In *

Disclaimer: By submitting an email address or phone number in this form, you consent to receive email and/or text messages from Maximus Marketing Management, our members, and/or our official partners at the email address or phone number provided, including automated messages and messages related to Customer Care. Consent is not a condition of purchase. Msg & data rates may apply for text messages. Msg frequency varies. Unsubscribe at any time by replying STOP or clicking the unsubscribe link (where available). Reply HELP for help. See more info at: MaximusMarketingManagement.com/privacy-policy
How do you feel about your current social media posting schedule? *
Do you currently have a dedicated social media manager?
Which platforms are you currently using?
What has been your experience with running ads / boosting posts?
What do you think went wrong with your ad campaign?
What kind of results do your organic posts normally get?
Which platforms do you, or would you run ads on?
What’s your estimated average monthly ad budget?
Do you have a brand style guide or existing content strategy?
What’s your biggest challenge with social media right now?
What types of content do you prefer? (Check all that apply)
How soon are you looking for help?
What’s the best next step for you? *

Get Your
SEO REPORT!

Want to know how your website is performing in search results?

Our FREE SEO REPORT gives you insights into your website’s strengths, weaknesses, and opportunities to rank higher on Google.


What’s Included?

  • Your website’s SEO health score
  • Keyword & ranking analysis
  • Speed & performance insights
  • Mobile & user experience check
  • Actionable improvement tips

Maximus
Marketing
Management

Project Inuqiry:

- Step 2

Prefer To Talk In Person?
Let's Schedule A Chat...

Disclaimer: By submitting an email address or phone number to this website, you consent to receive email and/or text messages from Maximus Marketing Management, our members, and/or our partners at the email address or phone number provided, including automated messages and messages related to Customer Care. Consent is not a condition of purchase. Msg & data rates may apply for text messages. Msg frequency varies. Unsubscribe at any time by replying STOP or clicking the unsubscribe link (where available). Reply HELP for help. See more info at: MaximusMarketingManagement.com/privacy-policy

Great Success!

Nice Work
Your message
has been sent!

Thanks for reaching out! If you’ve scheduled a meeting through the calendar app, be sure to see the Meeting Details link below.
If you have sent a message or filled out a form, you should check your email for the automated response. In either case, you will most likely get a personal response in the next 24 hours just to follow up. Check your spam folder just to be sure you are seeing our messages